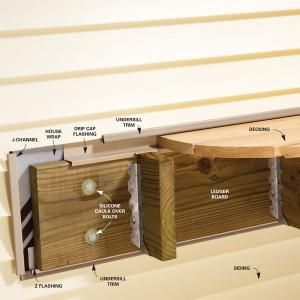
How Is Flashig Attached Behind Siding

Deck Ledger Board Installation Google Search Removing Vinyl Siding Vinyl Siding Vinyl Siding Cost
Pin On Repair Vinyl Siding And Gutters

Siding Transitions Vertical Siding Vertical Siding Exterior House Cladding

Tips On Removing Vinyl Siding For Attaching Ledger Board Building A Deck Under Deck Ceiling Deck Installation

Pin By Jake Demeer On Porch Building A Deck Timber Deck Deck Framing

Pin On Backyard

Pry the siding out near a nail then push the pry bar against the nail as you partially tap the siding back in.
How is flashig attached behind siding.

Attaching A New Deck To A House The Correct Method Deck Building Plans Building A Deck Diy Deck

Pin On Info With Some How To S

Deck Ledgers Best Practices Manual Hammer Hand Pacific Nw Builder Diy Deck Building A Deck Deck Design

Attaching Pergolas To Vinyl Siding Google Search Building A Deck Deck With Pergola Diy Deck

Pin On Construction

Pin On Roof

Pin On Diy Repairs

Pin On Deck

Pin On Construction

Pin On Building Science

Pin On Front Porch Siding

13 Simple Vinyl Siding Installation Tips Vinyl Siding Installation Installing Siding Vinyl Siding

Pin On Roofing Design

Pin On Fyi For Rehabs

Vinyl Siding Fiber Cement Siding Cement Siding Vinyl Siding Fiber Cement Siding

Pin On Skylite

Pin On Metal Roofs

Pin On Decks
Https Encrypted Tbn0 Gstatic Com Images Q Tbn 3aand9gcsvqfesqklvzh63sunuyqluje F9j9lkaylpokowbuhowliffug Usqp Cau

This Illustration Shows The Correct Way To Detail The Transition Between Dissimilar Cladding Types A Flas Exterior Cladding Cladding Installing Exterior Door

Pin On New House Exterior

Pin On Patio

Pin On Outdoor Ideas

It S Ok We Ve Got The Tools To Fix This Aluminum Siding Black Decker Projects
Source : pinterest.com
